Locations Help

Personal Online Banking Login

Business Banking

Login

Mortgage Statements

Login

Credit Card Logins

Go

Wealth - Trust & Investments

Login

Wealth - Raymond James

Login

Wealth - (RPS) Epic Advisor

Login

Accounts

Overview

  • Red represents debt accounts
  • Add an Account lets you add any account including loans, property, credit cards and investments
  • Click an account to edit it

Note: An Online Banking user can choose to only aggregate accounts (which will then appear in the Outside Accounts widget on the Online Banking Home Page). A user doesn’t need to use other Money Management features if they don’t wish to.
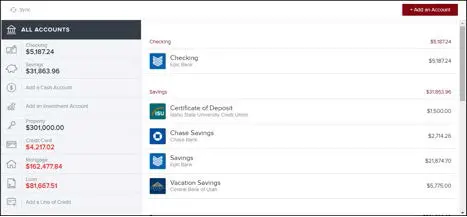
Screen capture showing overview page

Edit an Account

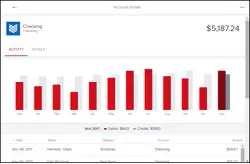
  • Activity:
    • Click a bar to see monthly transactions
  • Details:
    • Change the Account Name, Account Type and Interest Rate
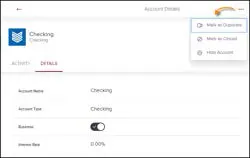
    • Mark an account as Business or Not
  • Dot Menu at Upper Right:
    • Mark as Duplicate merges two accounts together. Click this if you see two versions of the same account
    • Hide Account hides the account's data from the application
    • Non-Host accounts also have a Delete option
  • Screen capture showing the chart of monthly activity

    Screen capture of edit page


Add an Account

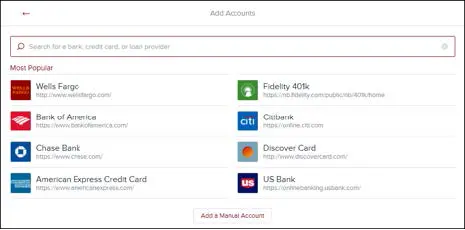
  • Click the Search Bar to find a specific savings, loan, credit card or investment account. Note that the URL listed in the search results won't necessarily be the one you typically use.
  • Once you've found your institution, enter your UserID, password, and answer any multifactor authentication challenge.
  • If an account requires attention, it will display a red or yellow exclamation mark. Click it and follow the prompts to resolve the issue.
  • Add a Manual Account lets you add a manual savings, property, investment, etc. account
Screen capture of add an account page


Trouble Adding an Account?

  1. Check all the available account types listed under an institution when you search. Sometimes mortgage, savings, credit card, etc. accounts are listed separately. You might also have to search for the specific account (i.e., "Bank of America mortgage," as opposed to just "Bank of America").
  2. Verify your username and password with your institution to ensure your credentials haven't expired. Sometimes signing in can unlock a frozen account connection.
  3. Turn off complicated security preferences (such as CAPTCHA and picture passwords) on your institution's site.
  4. Allow your institution to accept third-party access by changing the preferences on their site.
  5. Make sure you aren't simultaneously logged in to your institution's site on another tab or browser.
  6. Make sure the software isn't waiting for your response to a security question.
  7. If a connection breaks, you may have to enter your credentials again.


Seeing Outdated Accounts and Paid-Off Loans?

Sometimes the data we receive doesn't signal when an account is deleted. If you want us to delete an outdated account, submit a support ticket.


Need To Fix an Account That is "Broken"?

Broken accounts have a red or yellow exclamation mark in the top right corner of the account card. To fix the connection:

  1. Click the broken account
  2. Click the red or yellow warning message in the Link Status section
  3. Re-enter your login credentials

If the account continues to fail:

  1. Log in to your financial institution's online banking to verify that your credentials are correct and that there are no holds on the account.
  2. Add the account again, and pay special attention to the institution name to make sure you are attempting to add the correct account. Many institutions have similar names.

Note: If a connection is persistently down for more than two days, please submit a support ticket.


Deleting an Account

To delete an account:

  1. Click the account you'd like to delete
  2. Click the Dot Menu at upper right then “Delete Account”

You can't delete accounts at your primary financial institution. Instead, you can exclude these accounts. To do so:

  1. Click the account
  2. Click the Dot Menu and then “Hide Account”

Note that any data older than 90 days cannot be restored in Money Management if you want to re-add an account you've deleted.


Seeing Duplicate Accounts?

You may occasionally see duplicate accounts from an automated feed. You can fix this problem by either merging the duplicate accounts or by deleting one of the duplicates.

To merge an account:

  1. Click the duplicate account
  2. Click the Dot Menu, then Mark as Duplicate
  3. Click Merge
  4. Type MERGE into the appropriate box

Note: You can only merge accounts that come through the same automated feed.


Alerts

Notifications

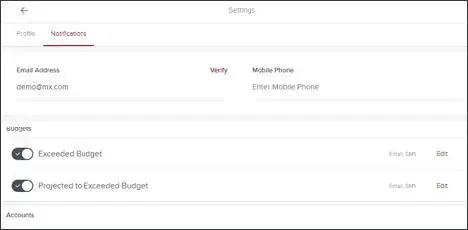
  • Click the Settings gear icon at upper right, then the Notifications tab
  • Alerts are sent to the Notifications section of the product (bell icon)
  • If you also want to receive alerts via email, first verify your email by clicking on the Verify next to the email address field. If you want to receive alerts via text, enter your mobile number and verify it.
  • Notifications will be delivered nightly after account information has been updated. Budget alerts will be grouped into one email. Other alerts will appear in separate emails.
Screen capture showing the settings gear icon and the notification iconScreen capture of the notifications page


Managing Alerts

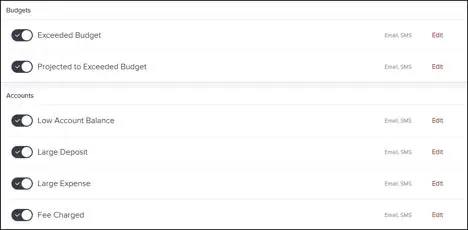
  • Use the toggle switch to enable or disable each alert.
  • Click "Edit" to choose how to receive alerts, to choose which accounts will be tracked, and/or to change the amount at which an alert is triggered.
Screen capture of the managing alerts page


Alert Definitions

Exceeded Budget

  • Triggered any time spending in a category exceeds the budgeted amount. Example: You have exceeded your Food & Dining budget by $12.

Projected to Exceeded Budget

  • Triggered any time spending in a category is projected to exceed the budgeted amount.

Low Account Balance

  • Triggered any time an account falls below an amount specified by the user. Example: An account balance falls below $100

Large Deposit

  • Triggered any time there is a deposit above an amount specified by the user. Example: An income transaction of $1,500 occurs.

Large Expense

  • Triggered any time there is an expense transaction above an amount specified by the user. Example: A large expense over $400 occurs.

Fee Charge

  • Triggered any time there is transaction categorized within "Fees & Charges".

Budgets

Overview

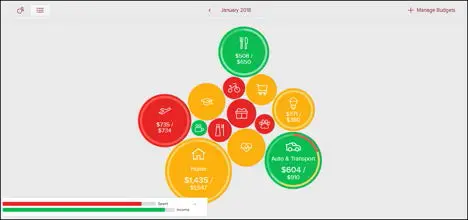
  • Auto-generated budgets use averages from last 90 days of transactions – recommendation is to use the auto-generate option the first time you access Budgets
  • Green = less than 80% of a budget is used.
  • Yellow = more than 80% of a budget is used.
  • Red = more than 100% of a budget is used.
  • Bands around the edge of each bubble represent sub-budgets
  • Upper left: Toggle between Bubbles view and List view with these 2 icons
  • Top middle: Select a different month
  • Upper right: Select "Manage Budgets" to add or remove items
  • Lower left: Expand to see and edit projected income and amount unbudgeted
  • Select a budget to edit it
Screen capture showing budget over page


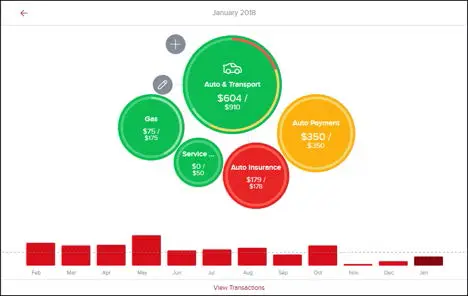
Edit a Budget

  • Select the budget item. Sub-budgets appear below the budget item.
  • Use the chart at the bottom to budget with your historical spending in mind. The dotted line in the chart shows the current budgeted amount.
  • Select the Plus sign to add sub-budgets.
  • Select the Pencil icon to edit the budget amount or delete it.
  • Select a sub-budget to see details, edit its amount, or delete it. Note that the parent budget’s amount won’t decrease if you delete a sub-budget.
Screen capture showing edit budget page


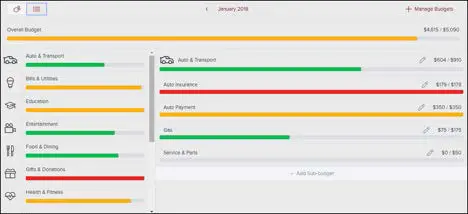
Budgets in List View

  • Detailed list of budgets and sub-budgets. Quickly make edits without the need to navigate in and out of the budget details window.
  • Select a budget to make changes, including changing the amount, deleting it, and adding sub-budgets.
    • Selecting a budget displays a list of sub-budgets, along with the amount you've used.
    • Select the dollar amount in the right-hand column to change how much is allocated to a particular budget.
  • A parent budget doesn't automatically decrease if you delete a sub-budget.
  • Select the bubble icon to return to the bubble budgets view.
Screen capture showing budgets in a list view

Cash Flow

FAQs

Cash Flow helps individuals understand not just their historical spending, but also predict their future spending. It also allows users to easily identify and add recurring bills and payments.

In addition, Cash Flow lets users add one-time or annual payments for items that may be considerable and require future planning, such as property tax.


Main Screen

Provides a forecast visualization of Current Cash Available across selected date range and according to current account filter. Hover over any point on the graph to see Ending Balance for that day.
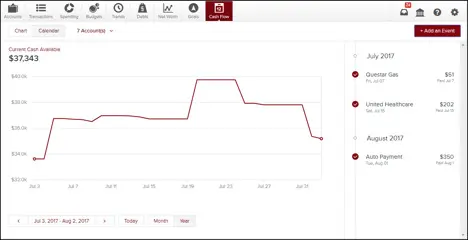
  • Cash Events: Timeline displays upcoming Cash Events. You can add new or edit existing events.
    Overdue events are flagged with a red exclamation mark.
  • Date Picker: Select the displayed date range
  • Accounts Filter: View All Accounts or filter by specific Accounts

Screen show showing the main screen


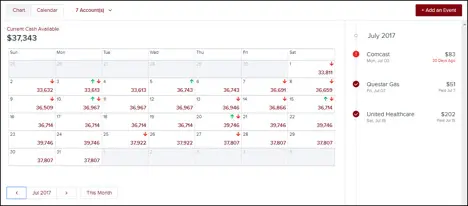
Toggle Calendar View

  • Gives an alternative view of expenses and income for selected month

  • Expenses and Income represented by red down arrows and green up arrows, respectively
Screen shot showing the toggle calendar view


Cash Events

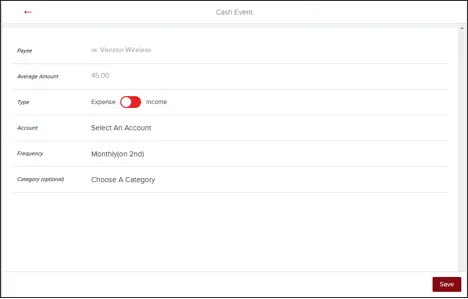
Cash Events are recurring or one-time events (income or expenses) represented in your Cash Flow forecast.
Cash Events include the following  properties:
  • Payee (Event Name): Name of cash event
  • Average Amount: Amount of  recurring transaction
  • Type: Whether this event is an  expense or income
  • Account: Account associated  with event
  • Frequency: Date and  repeating schedule
  • Category (optional): Choose  appropriate category

Screenshot showing the cash events page


Adding Cash Events

Create Cash Events

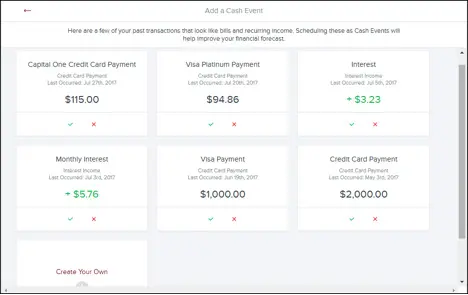
  • Click Add an Event to create new recurring or one-time events
  • List displays of suggested recurring events based on transaction history. Select green check mark to add  event to your Cash Events list
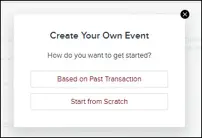
  • Don’t see the desired transaction? Select “Create your Own”

Create Manual Cash Events

Allows you to manually enter a Cash Event that is not listed in the  suggested transactions.

Based on Past Transaction

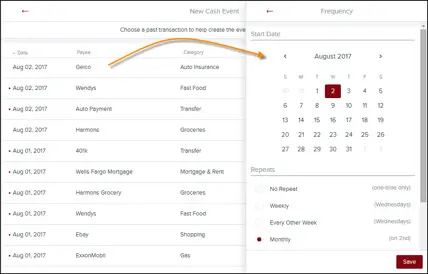
Pulls up a list of transactions from the last two months. Useful for  transactions that may not have yet recurred or otherwise do not  appear in the Suggested list.
  • Select a transaction
  • On popup: set Start Date, set Repeats info
  • Select Save

screenshot showing the create your own event pop up


Start from Scratch

Manually enter a Cash Event that is not currently  represented in your transactions.
Screenshot showing the screen when starting a cash event from scratchBased on Past Transaction

Screenshot showing starting a cash event based on a part transactionStart from Scratch


Edit Cash Events

Select a Cash Event from the Events list:

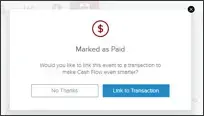
Manually Mark Paid: Update status of an overdue Cash Event that does not have a corresponding  matching transaction or if the transaction occurred outside of Cash Flow. Matching allows the forecast  to improve over time.
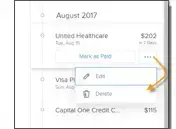
  • Edit Properties: select Screenshot showing the three dots to tap to edit propertiesand select Edit to edit its properties.


Screenshot showing the properties of the cash event   Screenshot showing the event marked as paid Screenshot showing the cash event details


Delete Cash Events

  • Select a Cash Event from the Events list, select  Screenshot showing the 3 dots to click to delete current cash event and select Delete to delete the current cash event.

  • You can also select  Screenshot showing the 3 dots to click on the edit screenon the Edit screen and select Delete.

  • You will be presented with these delete options:

Screenshot showing cash delete options


Debts

Overview

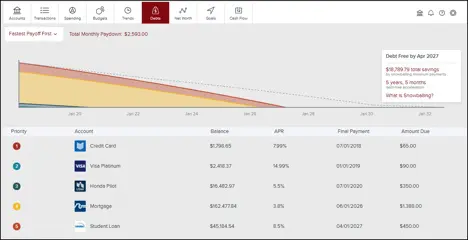
  • Debts: Automatically pulls in all your liability accounts.
  • Fastest Payoff: Select the “Fastest Payoff” dropdown to change the payoff method and see how various methods will affect your debt timeline. Your choice here also controls the Priority order in the list.
  • Total Monthly Paydown: Select “Total Monthly Paydown” to add money to your monthly payment and get you out of debt faster.
  • Chart Colors: Each color in the chart corresponds with the number color in the list.
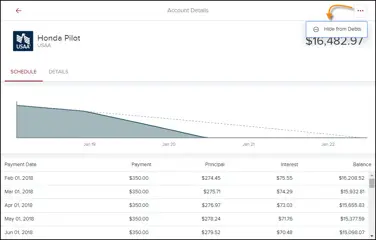
  • Edit Debt: Select a debt in the list to edit it.


  • Schedule tab contains payoff details.

  • “Hide from Debts” removes the debt from the main debt chart. Most useful for debts that you pay in full each month.
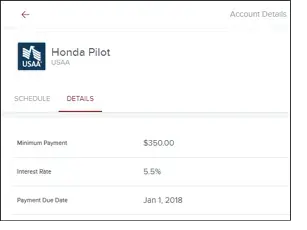
  • Select “Details” tab to edit these three fields. APR and Minimum Payment information comes through on some account types but not all.

Goals

Add a Goal

You can create three types of Goals: Savings, Debt Payoff and Retirement. We encourage all users to start by setting up a savings account for an emergency fund; saving $1,000 in an emergency-only account is a good start, but working towards 3-6 months of living expenses is a good longer-term goal.


Create a Savings Goal

  1. Select the Savings Goal Type
  2. Select a specific goal to save for
  3. Customize the Goal Name
  4. Specify the Amount to Save
  5. Select an Account & Save

Each goal must be tied to its own account, which will be used to measure progress towards that goal. You may choose to open new savings accounts in order to set additional goals.
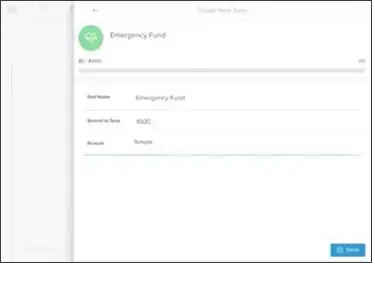
Screen capture showing details of creating a savings goal


Create a Debt Payoff Goal

  1. Select the Debt Payoff Goal Type
  2. Select Debts to Track & Save

While you can add any debt to the Goals tool, Goals will calculate your payoff based only on the amount you set to contribute in Goals, not accounting for any amount you have budgeted towards that debt in the Budgets tool.

Therefore, the Goals tool is best used for unbudgeted debts (usually credit cards), unless you plan to manually adjust your Monthly Goal Contribution to account for budgeted expenses.
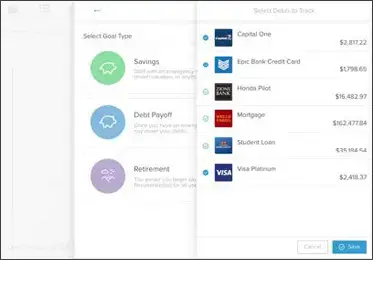
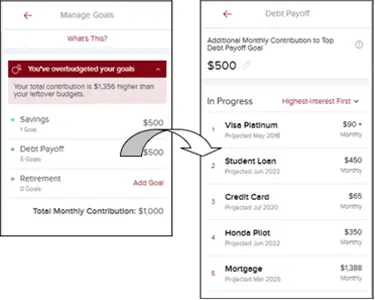
Screen capture showing creation of debt payoff goal


Manage Goals

  • This view is a quick overview of all current goals and progress towards each.
  • Goals are separated by Type: Debt Payoff, Savings and Retirement.
  • User is notified if there’s a problem, as seen on the left screen.
  • User is able to change the priority of current goals, by selecting from the “Highest-Interest First” dropdown.
  • Goals can be hidden by selecting the goal, then selecting “Hide from Goals” (not seen in screenshots).
Screen capture showing how to manage your goals

Net Worth

Overview

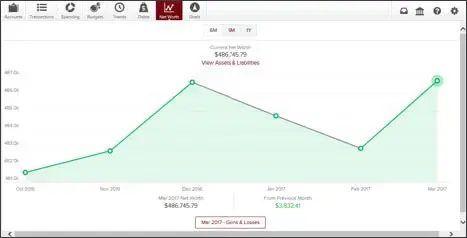
  • Net Worth tracks the net sum of all your assets and liabilities over the past year.
  • The dots on the graph represent your net worth for each month; the lines on the graph represent the change in your net worth from month to month.
  • Select a date option to change the selected range.
Screen capture of net worth overview page


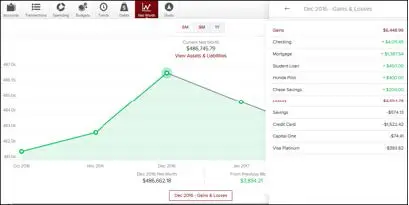
Gains and Losses

  • Selecting a specific dot on the graph and then the red Gains & Losses box at the bottom will display the gains and losses for that month.
  • Select an account to see transactions.
Screen capture of gains and losses page


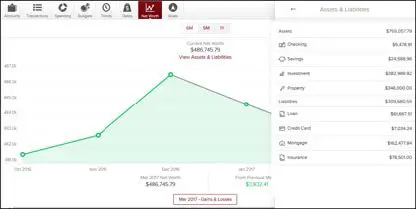
Assets and Liabilities

  • Select “View Assets & Liabilities” to view net worth details organized by type.
Screen capture of assets and liabilities page

Spending

Overview

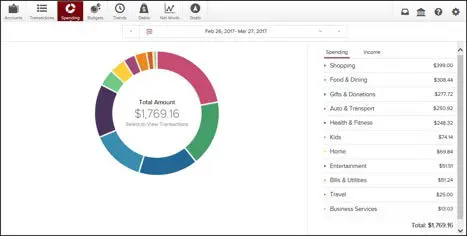
  • Select the date from the top navigation bar.
  • You can toggle between Spending and Income.
  • Each color in the spending wheel corresponds with the categories listed in the table.
  • Click a segment of the spending wheel to see subcategories. Click the center of the wheel to see specific transactions.
Screenshot showing the overview of the spending wheel


Not Seeing All Your Categories?

  • Check the Other category, which is a "catch all" in the spending view. Any category that represents less than 3 percent of total spending is represented in the Other category.
  • Also, be sure your transactions are properly categorized. Our system effectively categorizes most transactions, but some slip through. If you categorize transactions, the system will learn your preferences.


Does a Spending Category Seem Off?

  • Be sure your transactions are properly categorized. Our system effectively categorizes most transactions, but some slip through. If you categorize transactions, the system will learn your preferences.
  • Note that certain credit transactions such as reimbursements are counted in the spending wheel.

Transactions

Overview

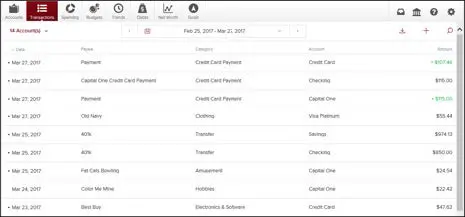
  • Select specific accounts in the top navigation bar. Click the date to see a calendar, or click the date dropdown to choose a specific range.
  • In the top navigation bar you can also add a transaction (for manual accounts only), export your transactions to CSV to view in Excel, and filter transactions.
  • Search by date, payee, category, account, amount, tags and memo.
  • The red dot at left indicates transactions that haven't been clicked on yet.
  • Green represents income.
  • Click a transaction to view details or to edit it.
Screen Capture of the overview page


Edit a Transaction

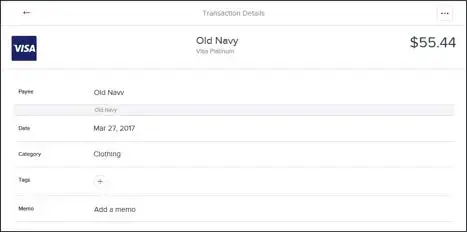
  • Change the payee, date and category. Over time, the software will learn your categorization preferences.
  • Click Category to select a different category, or add a new one. If you select a different category, a popup asks if you want to re-categorize all transactions from that Payee.
  • Click Tags to create searchable labels such as business, vacation, taxes, holidays, etc.
  • Click Memo to add details about this transaction.
  • Triple Dot Menu:
    • Exclude Transaction will hide the transaction from all calculations including budgets, spending, net worth, etc. Once excluded, a button will appear allowing you to Re-Include the transaction.
    • Split Transaction splits a transaction in two or more. Use this if a single transaction contains at least two separate categories.
    • To edit a split, open this screen again and click the trash can. Then create a new split.
  • Tip: Use your keyboard’s arrow keys to quickly switch between transactions.
Screen capture of editing a transaction


Seeing Duplicate Transactions?

Here a few reasons you might be seeing duplicate transactions:

  1. Your accounts have been added twice. If you see two of the same account, click one of them and then select Delete in the lower right corner.
  2. You're seeing both the debit and the credit side of a single transfer. Transactions categorized as transfers don't show up in the spending wheel or in your budgets because they don't represent an increase or decrease in assets.
  3. Your institution is duplicating certain transactions when it passes the data to us. Submit a support ticket to request us to resolve this issue.


Not Seeing All Your Transactions?

There could be a few different reasons for this, including:

  1. A transaction might be so recent that it's still pending and hasn't shown up yet.
  2. You've logged in for the first time. Only 90 days of transactions are pulled on the first log in.
  3. It has been more than 30 days since you last logged in. In most cases each new log in only pulls 30 to 45 days worth of transactions. To be sure all your transactions are included, we recommend logging in at least once every 30 days.

If these three reasons don't match what you're experiencing, submit a support ticket.

Pending Transactions

  • Pending Transactions appear in italics and a lighter color at the top of the transactions list. These are transactions that appear in your account but have not yet posted or been confirmed.
  • Some of the data of a pending transaction may change once it's posted, such as the date, description, and even the amount.
  • Pending Transactions can be permanently deleted by clicking Delete This Transaction.

Trends

Overview

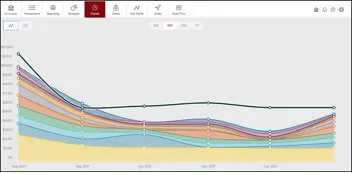
  • Chart colors correspond with the category colors in the spending wheel.
  • Change to List view by selecting icon at upper left
  • Hover over a color to see the exact amounts spent month to month.
  • Select a circle to view transactions for that month.
  • Select a color to see subcategory spending.


Trends Detail

  • See subcategory spending.
  • Select a circle to view transactions for that month.

Prefer Personal Assistance?

Our team of dedicated professionals are here to support you.